Search This Blog

Friday, 5 March 2021

GIT - Working with Remote repository GITHUB

Setup SSH Authentication with GITHUB Repository

Generate ssh keys on your linux machine

[osboxes@master ansible-playbooks]$ ssh-keygen -t rsa
Generating public/private rsa key pair.
Enter file in which to save the key (/home/osboxes/.ssh/id_rsa):
Enter passphrase (empty for no passphrase):
Enter same passphrase again:
Your identification has been saved in /home/osboxes/.ssh/id_rsa.
Your public key has been saved in /home/osboxes/.ssh/id_rsa.pub.
The key fingerprint is:
SHA256:iDSkhURVA9g/UILBIkV4mAdjdkr6QpF2iHFMhCPsrqk osboxes@linuxhost
The key's randomart image is:
+---[RSA 3072]----+
|*^%O*++          |
|/B%=o. .         |
|*Bo oo           |
|.o . oo.         |
|o . . ..S        |
| o               |
|..               |
|o                |
|E                |
+----[SHA256]-----+

[osboxes@master ansible-playbooks]$ cat ~/.ssh/id_rsa.pub
ssh-rsa AAAAB3NzaC1yc2EAAAADAQABAAABgQDHsN99astKP+jnHdSu6EtiY072Rllo4ILiZ4wwU5KISwjKVnUy9XGjVmMbFdQAJOczBRtw7AVmuo1vh5ieKa+BRvdJe1Sa7fZQVyHWqKxk+wkA1Mt6sSIkz3zzdte8hE9Ojmuqrqw3evjcwBywzf2Tz03JqSN2hhaXeQl8eK/DbO4y+NQXM2nOhVAGhpj1JWSCwXS9a1hWBF2OSHpJsmvcqVyDDWZvpjDoAwvJjd+n2XuZqyns/PVTy1WPq7AfWBigiGI8OTi/K97MKtDrSv0JgjX/aTVz5sirWxxxxxxxxxxxxxxxxxxxxxxxxxxxxxxxxxxxxqIzrPkq+MfpKDMtORfjjbzIdwuRgngZLUtPDI1EywCy2gNhaWwoeG3CTQ/aR1OsMDs/74u/S5ECcQTYW7Vpb/slQhm8I+yvyfqUky7M9zuLMaMZyfRwdawrMExtU= osboxes@master

Create a new github account if you don't have one 

https://github.com

Go to Settings -> SSH and GPG keys -> SSH keys -> Click on New SSH Key

Copy the id_rsa.pub key from linux machine and paste it here 


Enter the following command on your Linux Machine

[osboxes@master ansible-playbooks]$ ssh -T git@github.com

The authenticity of host 'github.com (140.82.114.4)' can't be established.
RSA key fingerprint is SHA256:nThbg6kXUpJWGl7E1IGOCspRomTxdCARLviKw6E5SY8.
Are you sure you want to continue connecting (yes/no/[fingerprint])? yes
Warning: Permanently added 'github.com,140.82.114.4' (RSA) to the list of known hosts.
Hi pavanbandaru! You've successfully authenticated, but GitHub does not provide shell access.

Create a repository on your local system and commit the changes to local repository before pushing your code to GITHUB

[osboxes@master ansible-playbooks]$ git init
Initialized empty Git repository in /home/osboxes/ansible-playbooks/.git/
[osboxes@master ansible-playbooks]$ git add .
[osboxes@master ansible-playbooks]$ git commit -m "My First commit to ansible playbooks"
[master (root-commit) e8f579c] My First commit to ansible playbooks
 15 files changed, 236 insertions(+)
 create mode 100644 addusers.yml
 create mode 100644 apache-install.yml
 create mode 100644 create_dir.yml
 create mode 100644 dict.yml
 create mode 100644 install-packages.yml
 create mode 100644 install-packages_1.yml
 create mode 100644 inventory-loops.yml
 create mode 100644 inventory.txt
 create mode 100644 iterating-loops.yml
 create mode 100644 limit-output.yml
 create mode 100644 linux-user.yml
 create mode 100644 mynewplaybook
 create mode 100644 new_inventory.txt
 create mode 100644 password.txt
 create mode 100644 register.yml
[osboxes@master ansible-playbooks]$ git status
On branch master
nothing to commit, working tree clean

Create a new repository on GITHUB and click on Code -> SSH and copy the URL link.


Go to your Linux machine and execute the following commands

[osboxes@master ansible-playbooks]$ git remote add origin git@github.com:pavanbandaru/ansible-playbooks.git

[osboxes@master ansible-playbooks]$ git remote -v
origin  git@github.com:pavanbandaru/ansible-playbooks.git (fetch)
origin  git@github.com:pavanbandaru/ansible-playbooks.git (push)

[osboxes@master ansible-playbooks]$ git push -u origin master

Warning: Permanently added the RSA host key for IP address '140.82.112.4' to the list of known hosts.
Enumerating objects: 17, done.
Counting objects: 100% (17/17), done.
Compressing objects: 100% (15/15), done.
Writing objects: 100% (17/17), 3.34 KiB | 285.00 KiB/s, done.
Total 17 (delta 2), reused 0 (delta 0), pack-reused 0
remote: Resolving deltas: 100% (2/2), done.
remote:
remote: Create a pull request for 'master' on GitHub by visiting:
remote:      https://github.com/pavanbandaru/ansible-playbooks/pull/new/master
remote:
To github.com:pavanbandaru/ansible-playbooks.git
 * [new branch]      master -> master
Branch 'master' set up to track remote branch 'master' from 'origin'.


Go to GITHUB and verify the changes


Make some changes to our local repository and push the changes to remote repository
( I have made changes to inventory-loops.yml file and I am going to push these changes to remote repository)

Check the status

[osboxes@master ansible-playbooks]$ git status
On branch master
Your branch is up to date with 'origin/master'.

Changes not staged for commit:
  (use "git add <file>..." to update what will be committed)
  (use "git restore <file>..." to discard changes in working directory)
        modified:   inventory-loops.yml

no changes added to commit (use "git add" and/or "git commit -a")

Check the difference

[osboxes@master ansible-playbooks]$ git diff
diff --git a/inventory-loops.yml b/inventory-loops.yml
index dba93c1..d50904f 100644
--- a/inventory-loops.yml
+++ b/inventory-loops.yml
@@ -1,5 +1,5 @@
 ---
-- name:  looping over inventory
+- name:  looping over inventory example
   hosts: all
   become: true
   become_user: root

Add file and commit the changes

[osboxes@master ansible-playbooks]$ git commit -am "updated inventory-loops.yml"
[master 10207db] updated inventory-loops.yml
 1 file changed, 1 insertion(+), 1 deletion(-)

Pull the remote repository to local before pushing into remote as a best practice. Changes would have been made to the remote repository by others. So to avoid conflicts, pull the repository before pushing it to remote. 

[osboxes@master ansible-playbooks]$ git pull origin master
warning: Pulling without specifying how to reconcile divergent branches is
discouraged. You can squelch this message by running one of the following
commands sometime before your next pull:

  git config pull.rebase false  # merge (the default strategy)
  git config pull.rebase true   # rebase
  git config pull.ff only       # fast-forward only

You can replace "git config" with "git config --global" to set a default
preference for all repositories. You can also pass --rebase, --no-rebase,
or --ff-only on the command line to override the configured default per
invocation.

Warning: Permanently added the RSA host key for IP address '140.82.114.3' to the list of known hosts.
From github.com:pavanbandaru/ansible-playbooks
 * branch            master     -> FETCH_HEAD
Already up to date.

Now push the changes to remote repository

[osboxes@master ansible-playbooks]$ git push origin master
Enumerating objects: 5, done.
Counting objects: 100% (5/5), done.
Compressing objects: 100% (3/3), done.
Writing objects: 100% (3/3), 314 bytes | 314.00 KiB/s, done.
Total 3 (delta 2), reused 0 (delta 0), pack-reused 0
remote: Resolving deltas: 100% (2/2), completed with 2 local objects.
To github.com:pavanbandaru/ansible-playbooks.git
   e8f579c..10207db  master -> master

We can see the changes on the remote repository


Install and configure GIT on Linux and working with local repository

Install git 

 [root@linuxhost ~]# yum install git -y

Step 2) Configure global configurations for any repository that we use in future.

[osboxes@linuxhost ~]$ git config --global user.name "Pavan Bandaru"
[osboxes@linuxhost ~]$ git config --global user.email "pavankumarbandaru@hotmail.com"
[osboxes@linuxhost ~]$ git config --global --list
user.name=Pavan Bandaru
user.email=pavankumarbandaru@hotmail.com

It created a config file under user home directory

[osboxes@linuxhost ~]$  cat ~/.gitconfig
[user]
        name = Pavan Bandaru
        email = pavankumarbandaru@hotmail.com

You can also check what Git thinks a specific key’s value is by typing git config <key>:

[osboxes@linuxhost ansible-playbooks]$ git config user.name
Pavan Bandaru
.
Create a projects directory

[osboxes@linuxhost ~]$ pwd
/home/osboxes
[osboxes@linuxhost ~]$ cd projects/
[osboxes@linuxhost projects]$ ls -rlt
total 0

Initialize a git repository

Create a new repository: By default Git will create a branch called master when you create a new repository with git init

[osboxes@linuxhost projects]$ git init sample-repo
Initialized empty Git repository in /home/osboxes/projects/sample-repo/.git/

[osboxes@linuxhost projects]$ ls -rlt
total 0
drwxrwxr-x. 3 osboxes osboxes 18 Mar  5 15:47 sample-repo

[osboxes@linuxhost projects]$ cd sample-repo/
[osboxes@linuxhost sample-repo]$ ls -rlt
total 0
[osboxes@linuxhost sample-repo]$ pwd
/home/osboxes/projects/sample-repo

[osboxes@linuxhost sample-repo]$ ls -lart
total 0
drwxrwxr-x. 3 osboxes osboxes  25 Mar  5 15:47 ..
drwxrwxr-x. 3 osboxes osboxes  18 Mar  5 15:47 .
drwxrwxr-x. 7 osboxes osboxes 119 Mar  5 15:47 .git
[osboxes@linuxhost sample-repo]$

Initialize git repository on existing project: I have an existing project ansible-playbooks and I wanted to create a repository with an existing project name. Run "git init" command under your project name directory.

/home/osboxes/projects/ansible-playbooks
[osboxes@linuxhost ansible-playbooks]$ ls -rlt
total 52
-rw-------. 1 osboxes osboxes    0 Feb 27 09:41 linux-user.yml.txt
-rw-------. 1 osboxes osboxes   10 Mar  3 15:59 password.txt
-rw-------. 1 osboxes osboxes  355 Mar  3 15:59 mynewplaybook
-rw-------. 1 osboxes osboxes 1197 Mar  3 15:59 linux-user.yml
-rw-------. 1 osboxes osboxes  259 Mar  3 15:59 install-packages.yml
-rw-------. 1 osboxes osboxes  491 Mar  3 15:59 create_dir.yml
-rw-------. 1 osboxes osboxes  654 Mar  3 15:59 apache-install.yml
-rw-------. 1 osboxes osboxes   14 Mar  3 15:59 inventory.txt
-rw-------. 1 osboxes osboxes  311 Mar  3 15:59 install-packages_1.yml
-rw-------. 1 osboxes osboxes  342 Mar  3 15:59 addusers.yml
-rw-------. 1 osboxes osboxes  295 Mar  3 16:19 dict.yml
-rw-------. 1 osboxes osboxes  716 Mar  3 19:39 register.yml
-rw-------. 1 osboxes osboxes  429 Mar  3 20:15 limit-output.yml
-rw-------. 1 osboxes osboxes  508 Mar  3 20:18 inventory-loops.yml

[osboxes@linuxhost ansible-playbooks]$ git init
Initialized empty Git repository in /home/osboxes/projects/ansible-playbooks/.git/


Check the status of your files (We are on the master branch and have not added any files)

[osboxes@linuxhost ansible-playbooks]$ git status
On branch master

No commits yet

Untracked files:
  (use "git add <file>..." to include in what will be committed)
        addusers.yml
        apache-install.yml
        create_dir.yml
        dict.yml
        install-packages.yml
        install-packages_1.yml
        inventory-loops.yml
        inventory.txt
        limit-output.yml
        linux-user.yml
        linux-user.yml.txt
        mynewplaybook
        password.txt
        register.yml

nothing added to commit but untracked files present (use "git add" to track)

Add the file to the git repository and commit the changes.  ( Now we added a file addusers.yml file and did not commit the changes. git status will track the changes)

[osboxes@linuxhost ansible-playbooks]$ git add addusers.yml
[osboxes@linuxhost ansible-playbooks]$ git status
On branch master

No commits yet

Changes to be committed:
  (use "git rm --cached <file>..." to unstage)
        new file:   addusers.yml

Untracked files:
  (use "git add <file>..." to include in what will be committed)
        apache-install.yml
        create_dir.yml
        dict.yml
        install-packages.yml
        install-packages_1.yml
        inventory-loops.yml
        inventory.txt
        limit-output.yml
        linux-user.yml
        linux-user.yml.txt
        mynewplaybook
        password.txt
        register.yml

commit the changes

[osboxes@linuxhost ansible-playbooks]$ git commit -m "First commit"
[master (root-commit) 51a789e] First commit
 1 file changed, 15 insertions(+)
 create mode 100644 addusers.yml

Use git add *  or git add . incase if you want to add all the files

[osboxes@linuxhost ansible-playbooks]$ git add *
[osboxes@linuxhost ansible-playbooks]$ git status
On branch master
Changes to be committed:
  (use "git restore --staged <file>..." to unstage)
        new file:   apache-install.yml
        new file:   create_dir.yml
        new file:   dict.yml
        new file:   install-packages.yml
        new file:   install-packages_1.yml
        new file:   inventory-loops.yml
        new file:   inventory.txt
        new file:   limit-output.yml
        new file:   linux-user.yml
        new file:   linux-user.yml.txt
        new file:   mynewplaybook
        new file:   password.txt
        new file:   register.yml

Untracked files:
  (use "git add <file>..." to include in what will be committed)
        .remote-sync.json

commit the changes 

[osboxes@linuxhost ansible-playbooks]$ git commit -m "Second commit - Added all the files"
[master 2debee7] Second commit - Added all the files
 13 files changed, 191 insertions(+)
 create mode 100644 apache-install.yml
 create mode 100644 create_dir.yml
 create mode 100644 dict.yml
 create mode 100644 install-packages.yml
 create mode 100644 install-packages_1.yml
 create mode 100644 inventory-loops.yml
 create mode 100644 inventory.txt
 create mode 100644 limit-output.yml
 create mode 100644 linux-user.yml
 create mode 100644 linux-user.yml.txt
 create mode 100644 mynewplaybook
 create mode 100644 password.txt
 create mode 100644 register.yml

Check the status now. There are no new file to commit.

[osboxes@linuxhost ansible-playbooks]$ git status
On branch master
nothing to commit, working tree clean

Modify an existing file and check the status ( I have modified a file addusers.yml )

[osboxes@linuxhost ansible-playbooks]$ git status
On branch master
Changes not staged for commit:
  (use "git add <file>..." to update what will be committed)
  (use "git restore <file>..." to discard changes in working directory)
        modified:   addusers.yml

no changes added to commit (use "git add" and/or "git commit -a")

Now you have two options to add and commit the changes

1) git add adduser.yml 
     git commit -m "Second commit on addusers"
2) git commit -am "Second commit on addusers" ( -a is for adding, -m is for commit message )

I used option 2 for adding and commit  my changes

[osboxes@linuxhost ansible-playbooks]$ git commit -am "Second commit on addusers"
[master ea3b865] Second commit on addusers
 1 file changed, 1 insertion(+), 1 deletion(-)
[osboxes@linuxhost ansible-playbooks]$ git status
On branch master
nothing to commit, working tree clean

Now modify an existing file and create a new file and check the status

[osboxes@linuxhost ansible-playbooks]$ git status
On branch master
Changes not staged for commit:
  (use "git add <file>..." to update what will be committed)
  (use "git restore <file>..." to discard changes in working directory)
        modified:   addusers.yml

Untracked files:
  (use "git add <file>..." to include in what will be committed)
        dictionary.yml

no changes added to commit (use "git add" and/or "git commit -a")

Now add a file adduser.yml and don't add the new file and check the status ( Here one file addusers.yml is in staging area )

[osboxes@linuxhost ansible-playbooks]$ git add addusers.yml
[osboxes@linuxhost ansible-playbooks]$ git status
On branch master
Changes to be committed:
  (use "git restore --staged <file>..." to unstage)
        modified:   addusers.yml

Untracked files:
  (use "git add <file>..." to include in what will be committed)
        dictionary.yml

Add the second file and check the status ( Both the file are in  "to be commited" state which is staging area )

[osboxes@linuxhost ansible-playbooks]$ git add dictionary.yml
[osboxes@linuxhost ansible-playbooks]$ git status
On branch master
Changes to be committed:
  (use "git restore --staged <file>..." to unstage)
        modified:   addusers.yml
        new file:   dictionary.yml

commit the change

[osboxes@linuxhost ansible-playbooks]$ git commit -m "Changes to adduser and added new file dictionar"
[master 34f1071] Changes to adduser and added new file dictionar
 2 files changed, 15 insertions(+), 1 deletion(-)
 create mode 100644 dictionary.yml
[osboxes@linuxhost ansible-playbooks]$

Un stage the added file ( Now I have modified the file and added but I don't want to commit the changes rather I wanted to un stage the file from Staging area. Use git restore --staged <file> command to revert the change )

[osboxes@linuxhost ansible-playbooks]$ git status
On branch master
Changes not staged for commit:
  (use "git add <file>..." to update what will be committed)
  (use "git restore <file>..." to discard changes in working directory)
        modified:   addusers.yml

no changes added to commit (use "git add" and/or "git commit -a")

[osboxes@linuxhost ansible-playbooks]$ git add addusers.yml
[osboxes@linuxhost ansible-playbooks]$ git status
On branch master
Changes to be committed:
  (use "git restore --staged <file>..." to unstage)
        modified:   addusers.yml

Unstage the changes

[osboxes@linuxhost ansible-playbooks]$ git restore --staged addusers.yml

[osboxes@linuxhost ansible-playbooks]$ git status
On branch master
Changes not staged for commit:
  (use "git add <file>..." to update what will be committed)
  (use "git restore <file>..." to discard changes in working directory)
        modified:   addusers.yml

no changes added to commit (use "git add" and/or "git commit -a")
[osboxes@linuxhost ansible-playbooks]$

Use the following command incase if you want to discard the changes in your working directory:
git restore <file>

[osboxes@linuxhost ansible-playbooks]$ git restore addusers.yml

[osboxes@linuxhost ansible-playbooks]$ git status
On branch master
nothing to commit, working tree clean

Display the history of commits are part of the current  repository. ( User git log command )

[osboxes@linuxhost ansible-playbooks]$ git log

commit 34f107160fd8ded3fd8a0e8edbd2088faa6570f6 (HEAD -> master)
Author: Pavan Bandaru <pavankumarbandaru@hotmail.com>
Date:   Fri Mar 5 16:51:49 2021 -0500

    Changes to adduser and added new file dictionar

commit ea3b86521585d7406d7d85e5448f9ea94dee3290
Author: Pavan Bandaru <pavankumarbandaru@hotmail.com>
Date:   Fri Mar 5 16:35:04 2021 -0500

    Second commit on addusers

commit 2debee75efcf276445cadbe2937e646c13166e6e
Author: Pavan Bandaru <pavankumarbandaru@hotmail.com>
Date:   Fri Mar 5 16:23:39 2021 -0500

    Second commit - Added all the files

commit 51a789e2399329a799245f90d63327f4a9b4715b
Author: Pavan Bandaru <pavankumarbandaru@hotmail.com>
Date:   Fri Mar 5 16:19:50 2021 -0500

    First commit


[osboxes@linuxhost ansible-playbooks]$ git log --oneline --graph --decorate --color
* 34f1071 (HEAD -> master) Changes to adduser and added new file dictionar
* ea3b865 Second commit on addusers
* 2debee7 Second commit - Added all the files
* 51a789e First commit

Revert already committed changes or remove files from git repository ( File has been deleted when we enter git rm <file> how ever the changes are is still in staging area. So commit the changes you have made )

[osboxes@linuxhost ansible-playbooks]$ git rm dictionary.yml
rm 'dictionary.yml'
[osboxes@linuxhost ansible-playbooks]$ git status
On branch master
Changes to be committed:
  (use "git restore --staged <file>..." to unstage)
        deleted:    dictionary.yml

[osboxes@linuxhost ansible-playbooks]$ git commit -m "remove the file dictionary"
[master 1dc84bb] remove the file dictionary
 1 file changed, 14 deletions(-)
 delete mode 100644 dictionary.yml
[osboxes@linuxhost ansible-playbooks]$ git status
On branch master
nothing to commit, working tree clean

Another way of removing the files using git add -u

[osboxes@linuxhost ansible-playbooks]$ rm dict.yml
[osboxes@linuxhost ansible-playbooks]$ git status
On branch master
Changes not staged for commit:
  (use "git add/rm <file>..." to update what will be committed)
  (use "git restore <file>..." to discard changes in working directory)
        deleted:    dict.yml

no changes added to commit (use "git add" and/or "git commit -a")

osboxes@linuxhost ansible-playbooks]$ git add -u
[osboxes@linuxhost ansible-playbooks]$ git status
On branch master
Changes to be committed:
  (use "git restore --staged <file>..." to unstage)
        deleted:    dict.yml

[osboxes@linuxhost ansible-playbooks]$ git commit -m " remove file dict.yml "
[master dbdb1e4]  remove file dict.yml
 1 file changed, 14 deletions(-)
 delete mode 100644 dict.yml

[osboxes@linuxhost ansible-playbooks]$ git status
On branch master
nothing to commit, working tree clean

Moving files using git mv command

[osboxes@linuxhost ansible-playbooks]$ git mv addusers.yml new
[osboxes@linuxhost ansible-playbooks]$ git status
On branch master
Changes to be committed:
  (use "git restore --staged <file>..." to unstage)
        renamed:    addusers.yml -> new/addusers.yml

[osboxes@linuxhost ansible-playbooks]$ git commit -m " addusers file moved to a different location "
[master 8f5dcd5]  addusers file moved to a different location
 1 file changed, 0 insertions(+), 0 deletions(-)
 rename addusers.yml => new/addusers.yml (100%)
[osboxes@linuxhost ansible-playbooks]$ git status
On branch master
nothing to commit, working tree clean
[osboxes@linuxhost ansible-playbooks]$

Ignoring Files

The rules for the patterns you can put in the .gitignore file are as follows:
  • Blank lines or lines starting with # are ignored.
  • Standard glob patterns work, and will be applied recursively throughout the entire working tree.
  • You can start patterns with a forward slash (/) to avoid recursivity.
  • You can end patterns with a forward slash (/) to specify a directory.
  • You can negate a pattern by starting it with an exclamation point (!).
Glob patterns are like simplified regular expressions that shells use. An asterisk (*) matches zero or more characters; [abc] matches any character inside the brackets (in this case a, b, or c); a question mark (?) matches a single character; and brackets enclosing characters separated by a hyphen ([0-9]) matches any character between them (in this case 0 through 9). You can also use two asterisks to match nested directories; a/**/z would match a/z, a/b/z, a/b/c/z, and so on.

Here is another example .gitignore file:
# ignore all .a files
*.a

# but do track lib.a, even though you're ignoring .a files above
!lib.a

# only ignore the TODO file in the current directory, not subdir/TODO
/TODO

# ignore all files in any directory named build
build/

# ignore doc/notes.txt, but not doc/server/arch.txt
doc/*.txt

# ignore all .pdf files in the doc/ directory and any of its subdirectories
doc/**/*.pdf

Example: I want to ignore files ending with .log

[osboxes@linuxhost ansible-playbooks]$ cat .gitignore
*.log

[osboxes@linuxhost ansible-playbooks]$ git status
On branch master
Untracked files:
  (use "git add <file>..." to include in what will be committed)
        .gitignore

nothing added to commit but untracked files present (use "git add" to track)

[osboxes@linuxhost ansible-playbooks]$ git add .gitignore

[osboxes@linuxhost ansible-playbooks]$ git commit -m "added gitignore file"
[master 8e582b3] added gitignore file
 1 file changed, 1 insertion(+)
 create mode 100644 .gitignore

Viewing Your Staged and Unstaged Changes using git diff command ( git status will not show you exactly what is changed. git diff --staged command compares your staged changes to your last commit )

[osboxes@linuxhost ansible-playbooks]$ git status
On branch master
Changes to be committed:
  (use "git restore --staged <file>..." to unstage)
        modified:   register-new.yml

[osboxes@linuxhost ansible-playbooks]$ git diff --staged
diff --git a/register-new.yml b/register-new.yml
index 96dea29..8986d05 100644
--- a/register-new.yml
+++ b/register-new.yml
@@ -1,6 +1,6 @@

 ---
-- name: Register loop variable results
+- name: Register loop example^M
   hosts: all
   become: true
   become_user: root

I have remove few lines of code in loop.yml in working directory. use git diff to see the changes in the file that are staged and the changes that are unstaged.

[osboxes@linuxhost ansible-playbooks]$ git diff
diff --git a/loops.yml b/loops.yml
index dba93c1..a628e21 100644
--- a/loops.yml
+++ b/loops.yml
@@ -13,8 +13,3 @@
       debug:
         msg: "{{ item }}"
       loop: "{{ ansible_play_batch }}"
-
-    - name: Show all the hosts in the inventory
-      debug:
-        msg: "{{ item }}"
-      loop: "{{ query('inventory_hostnames', 'all') }}"


Kubernetes

Kubernetes Tasks


Kubernetes Interview Questions


Deploy tomcat app on Kubernetes

Task: Deploy Tomcat App on Kubernetes 

Task Details

A new java-based application is ready to be deployed on a Kubernetes cluster. The development team had a meeting with the DevOps team share requirements and application scope. The team is ready to setup an application stack for it under their existing cluster. Below you can find the details for this:

Create a namespace named tomcat-namespace-nautilus.

Create a deployment for tomcat app which should be named tomcat-deployment-nautilus under the same namespace you created. Replicas count should be 1, the container should be named as tomcat-container-nautilus, its image should be gcr.io/kodekloud/centos-ssh-enabled:tomcat and its container port should be 8080.

Create a service for tomcat app which should be named as tomcat-service-nautilus under the same namespace you created. Service type should be NodePort. Port's protocol should be TCP, port should be 80, targetPort should be 8080 and nodePort should be 32227.

Before clicking on Finish button please make sure the application is up and running.

You can use any labels as per your choice.

Note: The kubectl on jump_host has been configured to work with the kubernetes cluster.


1. Run the following commands on the jump server to list namespaces and services

thor@jump_host /$ kubectl get namespace
NAME              STATUS   AGE
default           Active   12m
kube-node-lease   Active   12m
kube-public       Active   12m
kube-system       Active   12m

thor@jump_host /$ kubectl get services
NAME         TYPE        CLUSTER-IP   EXTERNAL-IP   PORT(S)   AGE
kubernetes   ClusterIP   10.96.0.1    <none>        443/TCP   12m

2. Create namespace as per the task request.

thor@jump_host /$ kubectl create namespace tomcat-namespace-nautilus
namespace/tomcat-namespace-nautilus created

thor@jump_host /$ kubectl get namespace
NAME                        STATUS   AGE
default                     Active   13m
kube-node-lease             Active   13m
kube-public                 Active   13m
kube-system                 Active   13m
tomcat-namespace-nautilus   Active   9s

3. Create deploy.yaml file using --dry-run command and modify later as per your requirements.

thor@jump_host ~$ kubectl create deploy tomcat-namespace-nautilus --image=gcr.io/kodekloud/centos-ssh-enabled:tomcat --dry-run=client -o yaml > deploy.yaml

deploy.yml file would look like below after modification

thor@jump_host ~$ vi deploy.yaml 
thor@jump_host ~$ cat deploy.yaml 
apiVersion: apps/v1
kind: Deployment
metadata:
  name: tomcat-deployment-nautilus
  namespace: tomcat-namespace-nautilus
spec:
  replicas: 1
  selector:
    matchLabels:
      app: tomcat-deployment-nautilus
  template:
    metadata:
      labels:
        app: tomcat-deployment-nautilus
    spec:
      containers:
      - image: gcr.io/kodekloud/centos-ssh-enabled:tomcat
        name: tomcat-container-nautilus
        ports:
        - containerPort: 8080


Create a deployment 

thor@jump_host ~$ kubectl apply -f deploy.yaml
deployment.apps/tomcat-deployment-nautilus created

thor@jump_host ~$ kubectl get deploy --all-namespaces
NAMESPACE                   NAME                         READY   UP-TO-DATE   AVAILABLE   AGE
kube-system                 coredns                      2/2     2            2           19m
tomcat-namespace-nautilus   tomcat-deployment-nautilus   1/1     1            1           106s

thor@jump_host ~$ kubectl get pods --all-namespaces
NAMESPACE                   NAME                                          READY   STATUS    RESTARTS   AGE
kube-system                 coredns-f9fd979d6-4t9x6                       1/1     Running   0          19m
kube-system                 coredns-f9fd979d6-pwfp2                       1/1     Running   0          19m
kube-system                 etcd-controlplane                             1/1     Running   0          19m
kube-system                 kube-apiserver-controlplane                   1/1     Running   0          19m
kube-system                 kube-controller-manager-controlplane          1/1     Running   0          19m
kube-system                 kube-flannel-ds-amd64-hx7nz                   1/1     Running   0          19m
kube-system                 kube-flannel-ds-amd64-rb26q                   1/1     Running   0          19m
kube-system                 kube-proxy-4qwmv                              1/1     Running   0          19m
kube-system                 kube-proxy-dc7zt                              1/1     Running   0          19m
kube-system                 kube-scheduler-controlplane                   1/1     Running   0          19m
tomcat-namespace-nautilus   tomcat-deployment-nautilus-59c4c6c6bd-657pd   1/1     Running   0          2m17s

4. Create service.yaml file using --dry-run command and modify file service.yaml as per your requirements.

thor@jump_host ~$ kubectl expose deploy tomcat-deployment-nautilus --namespace=tomcat-namespace-nautilus --name=tomcat-service-nautilus --type=NodePort --port=80 --target-port=8080 --dry-run=client -o yaml > service.yaml

service.yaml file would look like below after modification

thor@jump_host ~$ vi service.yaml 
thor@jump_host ~$ cat service.yaml 
apiVersion: v1
kind: Service
metadata:
  name: tomcat-service-nautilus
  namespace: tomcat-namespace-nautilus
spec:
  ports:
  - port: 80
    protocol: TCP
    targetPort: 8080
    nodePort: 32227
  selector:
    app: tomcat-deployment-nautilus
  type: NodePort

Create a service

thor@jump_host ~$ kubectl apply -f service.yaml
service/tomcat-service-nautilus unchanged

thor@jump_host ~$ kubectl get service --all-namespaces
NAMESPACE                   NAME                      TYPE        CLUSTER-IP       EXTERNAL-IP   PORT(S)                  AGE
default                     kubernetes                ClusterIP   10.96.0.1        <none>        443/TCP                  29m
kube-system                 kube-dns                  ClusterIP   10.96.0.10       <none>        53/UDP,53/TCP,9153/TCP   29m
tomcat-namespace-nautilus   tomcat-service-nautilus   NodePort    10.100.134.191   <none>        80:32227/TCP             46s

Validations:

thor@jump_host ~$ kubectl get no -o wide
NAME           STATUS   ROLES    AGE   VERSION   INTERNAL-IP   EXTERNAL-IP   OS-IMAGE             KERNEL-VERSION       CONTAINER-RUNTIME
controlplane   Ready    master   30m   v1.19.0   172.17.0.11   <none>        Ubuntu 18.04.5 LTS   4.15.0-122-generic   docker://19.3.13
node01         Ready    <none>   29m   v1.19.0   172.17.0.14   <none>        Ubuntu 18.04.5 LTS   4.15.0-122-generic   docker://19.3.13

thor@jump_host ~$ curl 172.17.0.14:32227
<!DOCTYPE html>
<!--
To change this license header, choose License Headers in Project Properties.
To change this template file, choose Tools | Templates
and open the template in the editor.
-->
<html>
    <head>
        <title>SampleWebApp</title>
        <meta charset="UTF-8">
        <meta name="viewport" content="width=device-width, initial-scale=1.0">
    </head>
    <body>
        <h2>Welcome to xFusionCorp Industries!</h2>
        <br>
    
    </body>
</html>

What is a version control system ?

Version control is a system that records changes to a file or set of files over time so that you can recall specific versions later. 

If you are a graphic or web designer and want to keep every version of an image or layout (which you would most certainly want to), a Version Control System (VCS) is a very wise thing to use. It allows you to revert selected files back to a previous state, revert the entire project back to a previous state, compare changes over time, see who last modified something that might be causing a problem, who introduced an issue and when, and more. Using a VCS also generally means that if you screw things up or lose files, you can easily recover. In addition, you get all this for very little overhead.

Local Version Control Systems

Many people’s version-control method of choice is to copy files into another directory (perhaps a time-stamped directory, if they’re clever). This approach is very common because it is so simple, but it is also incredibly error prone. It is easy to forget which directory you’re in and accidentally write to the wrong file or copy over files you don’t mean to.
To deal with this issue, programmers long ago developed local VCSs that had a simple database that kept all the changes to files under revision control.


One of the most popular VCS tools was a system called RCS, which is still distributed with many computers today. RCS works by keeping patch sets (that is, the differences between files) in a special format on disk; it can then re-create what any file looked like at any point in time by adding up all the patches.

Centralized Version Control Systems

The next major issue that people encounter is that they need to collaborate with developers on other systems. To deal with this problem, Centralized Version Control Systems (CVCSs) were developed. These systems (such as CVS, Subversion, and Perforce) have a single server that contains all the versioned files, and a number of clients that check out files from that central place. For many years, this has been the standard for version control.


This setup offers many advantages, especially over local VCSs. For example, everyone knows to a certain degree what everyone else on the project is doing. Administrators have fine-grained control over who can do what, and it’s far easier to administer a CVCS than it is to deal with local databases on every client.

However, this setup also has some serious downsides. The most obvious is the single point of failure that the centralized server represents. If that server goes down for an hour, then during that hour nobody can collaborate at all or save versioned changes to anything they’re working on. If the hard disk the central database is on becomes corrupted, and proper backups haven’t been kept, you lose absolutely everything — the entire history of the project except whatever single snapshots people happen to have on their local machines. Local VCSs suffer from this same problem — whenever you have the entire history of the project in a single place, you risk losing everything.

Distributed Version Control Systems

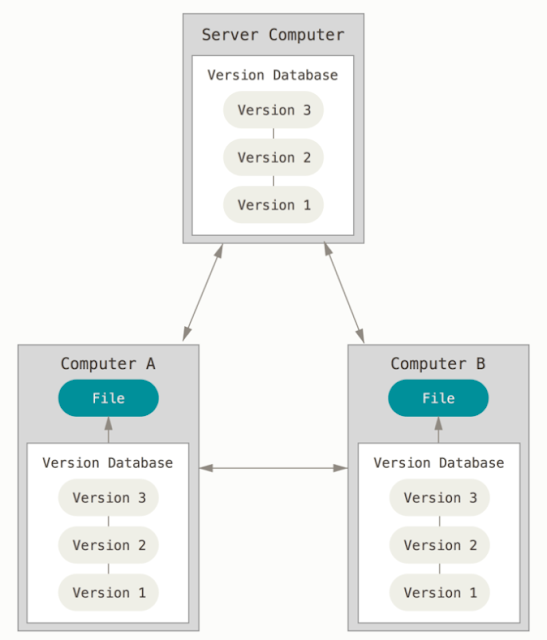
This is where Distributed Version Control Systems (DVCSs) step in. In a DVCS (such as Git, Mercurial, Bazaar or Darcs), clients don’t just check out the latest snapshot of the files; rather, they fully mirror the repository, including its full history. Thus, if any server dies, and these systems were collaborating via that server, any of the client repositories can be copied back up to the server to restore it. Every clone is really a full backup of all the data.


Furthermore, many of these systems deal pretty well with having several remote repositories they can work with, so you can collaborate with different groups of people in different ways simultaneously within the same project. This allows you to set up several types of workflows that aren’t possible in centralized systems, such as hierarchical models.

What is GIT ?

 Git is a version control system. The major difference between Git and any other VCS (Subversion and friends included) is the way Git thinks about its data. Conceptually, most other systems store information as a list of file-based changes. These other systems (CVS, Subversion, Perforce, Bazaar, and so on) think of the information they store as a set of files and the changes made to each file over time (this is commonly described as delta-based version control).

Storing data as changes to a base version of each file

Git doesn’t think of or store its data this way. Instead, Git thinks of its data more like a series of snapshots of a miniature filesystem. With Git, every time you commit, or save the state of your project, Git basically takes a picture of what all your files look like at that moment and stores a reference to that snapshot. To be efficient, if files have not changed, Git doesn’t store the file again, just a link to the previous identical file it has already stored. Git thinks about its data more like a stream of snapshots.

Git stores data as snapshots of the project over time

This is an important distinction between Git and nearly all other VCSs. It makes Git reconsider almost every aspect of version control that most other systems copied from the previous generation. This makes Git more like a mini filesystem with some incredibly powerful tools built on top of it, rather than simply a VCS. 

Nearly Every Operation Is Local

Most operations in Git need only local files and resources to operate  generally no information is needed from another computer on your network. If you’re used to a CVCS where most operations have that network latency overhead, this aspect of Git will make you think that the gods of speed have blessed Git with unworldly powers. Because you have the entire history of the project right there on your local disk, most operations seem almost instantaneous.

For example, to browse the history of the project, Git doesn’t need to go out to the server to get the history and display it for you — it simply reads it directly from your local database. This means you see the project history almost instantly. If you want to see the changes introduced between the current version of a file and the file a month ago, Git can look up the file a month ago and do a local difference calculation, instead of having to either ask a remote server to do it or pull an older version of the file from the remote server to do it locally.

This also means that there is very little you can’t do if you’re offline or off VPN. If you get on an airplane or a train and want to do a little work, you can commit happily (to your local copy, remember?) until you get to a network connection to upload. If you go home and can’t get your VPN client working properly, you can still work. In many other systems, doing so is either impossible or painful. In Perforce, for example, you can’t do much when you aren’t connected to the server; in Subversion and CVS, you can edit files, but you can’t commit changes to your database (because your database is offline). This may not seem like a huge deal, but you may be surprised what a big difference it can make.

Git Has Integrity

Everything in Git is checksummed before it is stored and is then referred to by that checksum. This means it’s impossible to change the contents of any file or directory without Git knowing about it. This functionality is built into Git at the lowest levels and is integral to its philosophy. You can’t lose information in transit or get file corruption without Git being able to detect it.

The mechanism that Git uses for this checksumming is called a SHA-1 hash. This is a 40-character string composed of hexadecimal characters (0–9 and a–f) and calculated based on the contents of a file or directory structure in Git. A SHA-1 hash looks something like this:

24b9da6552252987aa493b52f8696cd6d3b00373
You will see these hash values all over the place in Git because it uses them so much. In fact, Git stores everything in its database not by file name but by the hash value of its contents.

Git Generally Only Adds Data

When you do actions in Git, nearly all of them only add data to the Git database. It is hard to get the system to do anything that is not undoable or to make it erase data in any way. As with any VCS, you can lose or mess up changes you haven’t committed yet, but after you commit a snapshot into Git, it is very difficult to lose, especially if you regularly push your database to another repository.

This makes using Git a joy because we know we can experiment without the danger of severely screwing things up. For a more in-depth look at how Git stores its data and how you can recover data that seems lost, see Undoing Things.

The Three States

Pay attention now — here is the main thing to remember about Git if you want the rest of your learning process to go smoothly. Git has three main states that your files can reside in: modified, staged, and committed:
  1. Modified means that you have changed the file but have not committed it to your database yet.
  2. Staged means that you have marked a modified file in its current version to go into your next commit snapshot.
  3. Committed means that the data is safely stored in your local database.
This leads us to the three main sections of a Git project: the working tree, the staging area, and the Git directory.


Working tree, staging area, and Git directory.

The working tree is a single checkout of one version of the project. These files are pulled out of the compressed database in the Git directory and placed on disk for you to use or modify.

The staging area is a file, generally contained in your Git directory, that stores information about what will go into your next commit. Its technical name in Git parlance is the “index”, but the phrase “staging area” works just as well.

The Git directory is where Git stores the metadata and object database for your project. This is the most important part of Git, and it is what is copied when you clone a repository from another computer.

The basic Git workflow goes something like this:
  1. You modify files in your working tree.
  2. You selectively stage just those changes you want to be part of your next commit, which adds only those changes to the staging area.
  3. You do a commit, which takes the files as they are in the staging area and stores that snapshot permanently to your Git directory.
If a particular version of a file is in the Git directory, it’s considered committed. If it has been modified and was added to the staging area, it is staged. And if it was changed since it was checked out but has not been staged, it is modified.

Thursday, 4 March 2021

Create a symlink using puppet programming

 Task:
Create a puppet programming file apps.pp under /etc/puppetlabs/code/environments/production/manifests directory on puppet master node i.e on Jump Server. Within that define a class symlink and perform below mentioned tasks:
Create a symbolic link through puppet programming code. The source path should be /opt/data and destination path should be /var/www/html on all Puppet agents i.e on all App Servers.
Create a blank file media.txt under /opt/data directory on all puppet agent nodes i.e on all App Servers.
Note: Please perform this task using apps.pp only, do not create any separate inventory file.

Step 1) Create puppet class file apps.pp on jump host where puppet master is running

root@jump_host /# cd /etc/puppetlabs/code/environments/production/manifests
root@jump_host /etc/puppetlabs/code/environments/production/manifests# cat>apps.pp 
class symlink {
# create a symlink
 file { '/opt/data/':
      ensure => 'link',
      target => '/var/www/html',
 }
#media.txt file creation
 file { '/opt/data/media.txt':
      ensure => 'present',
      content => '',
 }
}
node 'stapp01.stratos.xfusioncorp.com', 'stapp02.stratos.xfusioncorp.com', 'stapp03.stratos.xfusioncorp.com' {
include symlink
}

Step 2) Validate the syntax 

root@jump_host /etc/puppetlabs/code/environments/production/manifests# puppet parser validate apps.pp

Step 3) Run puppet agent -tv on app server 1 and validate if the symlink and empty file is created. 

[root@stapp01 ~]# puppet agent -tv
Info: Using configured environment 'production'
Info: Retrieving pluginfacts
Info: Retrieving plugin
Info: Retrieving locales
Info: Caching catalog for stapp01.stratos.xfusioncorp.com
Info: Applying configuration version '1614862700'
Notice: /Stage[main]/Symlink/File[/opt/data/]/ensure: created
Notice: /Stage[main]/Symlink/File[/opt/data/media.txt]/ensure: defined content as '{md5}d41d8cd98f00b204e9800998ecf8427e'
Notice: Applied catalog in 0.05 seconds
[root@stapp01 ~]# cd /opt/data
[root@stapp01 data]# ls -rlt
total 0
-rw-r--r-- 1 root root 0 Mar  4 12:58 media.txt
[root@stapp01 data]# cd /var/www/html/
[root@stapp01 html]# ls -rlt
total 0
-rw-r--r-- 1 root root 0 Mar  4 12:58 media.txt
[root@stapp01 html]# cd ..
[root@stapp01 www]# ls -rlt
total 4
drwxr-xr-x 2 root root 4096 Mar  4 12:58 html
[root@stapp01 www]# cd /opt/
[root@stapp01 opt]# ls -rlt
total 8
drwxr-xr-x 1 root root 4096 May 23  2020 puppetlabs
lrwxrwxrwx 1 root root   13 Mar  4 12:58 data -> /var/www/html

Step 3) Run puppet agent -tv on app server 2 and validate if the symlink and empty file is created. 

[root@stapp02 ~]# puppet agent -tv
Info: Using configured environment 'production'
Info: Retrieving pluginfacts
Info: Retrieving plugin
Info: Retrieving locales
Info: Caching catalog for stapp02.stratos.xfusioncorp.com
Info: Applying configuration version '1614862834'
Notice: /Stage[main]/Symlink/File[/opt/data/]/ensure: created
Notice: /Stage[main]/Symlink/File[/opt/data/media.txt]/ensure: defined content as '{md5}d41d8cd98f00b204e9800998ecf8427e'
Notice: Applied catalog in 0.04 seconds
[root@stapp02 ~]# ls /opt/data
media.txt
[root@stapp02 ~]# ls /var/www/html/
media.txt
[root@stapp02 ~]# 

Step 3) Run puppet agent -tv on app server 3 and validate if the symlink and empty file is created. 

[root@stapp03 ~]# puppet agent -tv
Info: Using configured environment 'production'
Info: Retrieving pluginfacts
Info: Retrieving plugin
Info: Retrieving locales
Info: Caching catalog for stapp03.stratos.xfusioncorp.com
Info: Applying configuration version '1614862936'
Notice: /Stage[main]/Symlink/File[/opt/data/]/ensure: created
Notice: /Stage[main]/Symlink/File[/opt/data/media.txt]/ensure: defined content as '{md5}d41d8cd98f00b204e9800998ecf8427e'
Notice: Applied catalog in 0.06 seconds
[root@stapp03 ~]# ls /opt/data
media.txt
[root@stapp03 ~]# ls /var/www/html/
media.txt
[root@stapp03 ~]# 

Puppet


Wednesday, 3 March 2021

Ansible Loop examples

Simple Ansible playbook for demonstrating loop

[osboxes@master ansible-playbooks]$ cat install-packages.yml

---
- name: Install packages
  hosts: all
  become: true
  become_user: root
  tasks:
    - name: Install http and redis packages
      yum:
        name: "{{ item }}"
        state: present
      loop:
        - epel-release
        - redis
        - httpd


[osboxes@master ansible-playbooks]$ ansible-playbook install-packages.yml -i inventory.txt -K
BECOME password:

PLAY [Install packages] *************************************************************************************************************************************

TASK [Gathering Facts] **************************************************************************************************************************************
ok: [192.168.1.182]

TASK [Install http and redis packages] **********************************************************************************************************************
changed: [192.168.1.182] => (item=epel-release)
changed: [192.168.1.182] => (item=redis)
changed: [192.168.1.182] => (item=httpd)

PLAY RECAP **************************************************************************************************************************************************
192.168.1.182              : ok=2    changed=1    unreachable=0    failed=0    skipped=0    rescued=0    ignored=0


Create a play book for package installation and define the packages under vars section and use it in a loop.

[osboxes@master ansible-playbooks]$ cat install-packages_1.yml
---
- name: Install packages
  hosts: all
  become: true
  become_user: root
  vars:
    required_packages:
      - epel-release
      - redis
      - httpd

  tasks:
    - name: Install http and redis packages
      yum:
        name: "{{ item }}"
        state: present
      loop: "{{ required_packages }}"

[osboxes@master ansible-playbooks]$ ansible-playbook install-packages_1.yml -i inventory.txt -K
BECOME password:

PLAY [Install packages] *************************************************************************************************************************************

TASK [Gathering Facts] **************************************************************************************************************************************
ok: [192.168.1.182]

TASK [Install http and redis packages] **********************************************************************************************************************
ok: [192.168.1.182] => (item=epel-release)
ok: [192.168.1.182] => (item=redis)
changed: [192.168.1.182] => (item=httpd)

PLAY RECAP **************************************************************************************************************************************************
192.168.1.182              : ok=2    changed=1    unreachable=0    failed=0    skipped=0    rescued=0    ignored=0

Create a play book for Iterating over a list of hashes 

---
- name: Add multiple users belongs to different groups
  hosts: all
  become: true
  become_user: root
  tasks:
    - name: Add users
      user:
        name: "{{ item.name }}"
        state: present
        groups: "{{ item.groups }}"
      loop:
        - { name: 'user1', groups: 'wheel' }
        - { name: 'user2', groups: 'root' }


[osboxes@master ansible-playbooks]$ ansible-playbook addusers.yml -i inventory.txt

PLAY [Add multiple users belongs to differnt groups] ********************************************************************************************************

TASK [Gathering Facts] **************************************************************************************************************************************
ok: [192.168.1.182]

TASK [Add users] ********************************************************************************************************************************************
changed: [192.168.1.182] => (item={'name': 'user1', 'groups': 'wheel'})
changed: [192.168.1.182] => (item={'name': 'user2', 'groups': 'root'})

PLAY RECAP **************************************************************************************************************************************************
192.168.1.182              : ok=2    changed=1    unreachable=0    failed=0    skipped=0    rescued=0    ignored=0

Playbook for Iterative over a dictionary 

[osboxes@master ansible-playbooks]$ cat dict.yml
---
- name: dict2items
  hosts: all
  become: true
  become_user: root
  tasks:
    - name: dict2items
      debug:
        msg: "{{ item.key }} - {{ item.value }}"
      loop: "{{ tag_data | dict2items }}"
      vars:
        tag_data:
          Environment: dev
          Application: payment


[osboxes@master ansible-playbooks]$ ansible-playbook dict.yml -i inventory.txt --syntax-check

playbook: dict.yml

[osboxes@master ansible-playbooks]$ ansible-playbook dict.yml -i inventory.txt

PLAY [dict2items] *******************************************************************************************************************************************

TASK [Gathering Facts] **************************************************************************************************************************************
ok: [192.168.1.182]

TASK [dict2items] *******************************************************************************************************************************************
ok: [192.168.1.182] => (item={'key': 'Environment', 'value': 'dev'}) => {
    "msg": "Environment - dev"
}
ok: [192.168.1.182] => (item={'key': 'Application', 'value': 'payment'}) => {
    "msg": "Application - payment"
}

PLAY RECAP **************************************************************************************************************************************************
192.168.1.182              : ok=2    changed=0    unreachable=0    failed=0    skipped=0    rescued=0    ignored=0

Registering variable with a loop

---
- name: Register loop output as a variable
  hosts: all
  become: true
  become_user: root
  tasks:

    - name: Register loop output
      shell: "echo {{ item }}"
      loop:
        - "one"
        - "two"
      register: echo

    - name: Show register variale echo results
      debug: var=echo

    - name: Fail if return code is not 0
      fail:
        msg: "The command ({{ item.cmd }}) did not have a 0 return code"
      when: item.rc != 0
      loop: "{{ echo.results }}"

    - name: Place the result of the current item in the variable
      shell: echo "{{ item }}"
      loop:
        - one
        - two
      register: echo
      changed_when: echo.stdout != "one"


[osboxes@master ansible-playbooks]$ ansible-playbook register.yml -i inventory.txt

PLAY [Register loop output as a variable] *******************************************************************************************************************

TASK [Gathering Facts] **************************************************************************************************************************************
ok: [192.168.1.182]

TASK [Register loop output] *********************************************************************************************************************************
changed: [192.168.1.182] => (item=one)
changed: [192.168.1.182] => (item=two)

TASK [Fail if return code is not 0] *************************************************************************************************************************
skipping: [192.168.1.182] => (item={'cmd': 'echo one', 'stdout': 'one', 'stderr': '', 'rc': 0, 'start': '2021-03-03 19:30:37.399257', 'end': '2021-03-03 19:30:37.406175', 'delta': '0:00:00.006918', 'changed': True, 'invocation': {'module_args': {'_raw_params': 'echo one', '_uses_shell': True, 'warn': True, 'stdin_add_newline': True, 'strip_empty_ends': True, 'argv': None, 'chdir': None, 'executable': None, 'creates': None, 'removes': None, 'stdin': None}}, 'stdout_lines': ['one'], 'stderr_lines': [], 'failed': False, 'item': 'one', 'ansible_loop_var': 'item'})
skipping: [192.168.1.182] => (item={'cmd': 'echo two', 'stdout': 'two', 'stderr': '', 'rc': 0, 'start': '2021-03-03 19:30:38.668798', 'end': '2021-03-03 19:30:38.676035', 'delta': '0:00:00.007237', 'changed': True, 'invocation': {'module_args': {'_raw_params': 'echo two', '_uses_shell': True, 'warn': True, 'stdin_add_newline': True, 'strip_empty_ends': True, 'argv': None, 'chdir': None, 'executable': None, 'creates': None, 'removes': None, 'stdin': None}}, 'stdout_lines': ['two'], 'stderr_lines': [], 'failed': False, 'item': 'two', 'ansible_loop_var': 'item'})

TASK [Place the result of the current item in the variable] *************************************************************************************************
ok: [192.168.1.182] => (item=one)
changed: [192.168.1.182] => (item=two)

PLAY RECAP **************************************************************************************************************************************************
192.168.1.182              : ok=3    changed=2    unreachable=0    failed=0    skipped=1    rescued=0    ignored=0


Looping over inventory

[osboxes@master ansible-playbooks]$ cat inventory-loops.yml
---
- name:  looping over inventory
  hosts: all
  become: true
  become_user: root
  tasks:
    - name: Show all the hosts in the inventory
      debug:
        msg: "{{ item }}"
      loop: "{{ groups['all'] }}"

    - name: Show all the hosts in the current play
      debug:
        msg: "{{ item }}"
      loop: "{{ ansible_play_batch }}"

    - name: Show all the hosts in the inventory
      debug:
        msg: "{{ item }}"
      loop: "{{ query('inventory_hostnames', 'all') }}"


[osboxes@master ansible-playbooks]$ ansible-playbook inventory-loops.yml -i inventory.txt

PLAY [looping over inventory] *******************************************************************************************************************************

TASK [Gathering Facts] **************************************************************************************************************************************
ok: [192.168.1.182]

TASK [Show all the hosts in the inventory] ******************************************************************************************************************
ok: [192.168.1.182] => (item=192.168.1.182) => {
    "msg": "192.168.1.182"
}

TASK [Show all the hosts in the current play] ***************************************************************************************************************
ok: [192.168.1.182] => (item=192.168.1.182) => {
    "msg": "192.168.1.182"
}

TASK [Show all the hosts in the inventory] ******************************************************************************************************************
ok: [192.168.1.182] => (item=192.168.1.182) => {
    "msg": "192.168.1.182"
}

PLAY RECAP **************************************************************************************************************************************************
192.168.1.182              : ok=4    changed=0    unreachable=0    failed=0    skipped=0    rescued=0    ignored=0


Ansible vault examples

 Create a new playbook with ansible vault command to encrypt

[osboxes@master ansible-playbooks]$ ansible-vault create myplaybook.yml

New Vault password:

Confirm New Vault password:


Playbook is in encrypted format

[osboxes@master ansible-playbooks]$ cat myplaybook.yml
$ANSIBLE_VAULT;1.1;AES256
33323364653962656634346462396431306336343534663265646663356463623036656563313931
3264313266393965316435666439316661623763356164630a356463646366343662666637323263
34356433343061313432386262376566393536663930653030333863393130336563353931613466
3432343361613631620a396235363864663639306465396230366564666630616666336161316265
33613338666264323735326336303537353663363835316330393239666634366461383935373962
62646338663339333132646465343664613439316464373133633630656664663630343161633465
65316136653964313663363133636430663132393936326630656430383931373233646436663661
65663663383336643463653338326439353330376532363866663936366237646635386138383835
65363366616161393038656262373631633439356433336133653435626136616137633136336164
38623636326134633435306630613936313565376264666564303032383531393137666662653930
62323366343032613137393064353836396233313433666263396536666163666134313865383430
61333436626233633337323834633564636265333930333464366232663366326238313833363166
65633465666434616262303136383032643737653061323935373633353464653331


Command to view the exiting encrypted playbook

[osboxes@master ansible-playbooks]$ ansible-vault view  myplaybook.yml
Vault password:
---
- name: sample playbook
  hosts: all
  become: true
  become_user: root
  tasks:
    - name: create a user
      user:
        name: pavan
        uid: 3405
        state: present

Create a new playbook and supply a ansible vault password from a file

[osboxes@master ansible-playbooks]$ cat password.txt
abcdef123

[osboxes@master ansible-playbooks]$ ansible-vault create mynewplaybook --vault-password-file=password.txt

Note: this will not prompt you for the password rather is uses the password from a file.

How to edit an exiting encrypted ansible playbook

[osboxes@master ansible-playbooks]$ ansible-vault edit mynewplaybook
Vault password:


How to encrypt existing plain text playbook or file


[osboxes@master ansible-playbooks]$ cat inventory.txt
linuxhost

[osboxes@master ansible-playbooks]$ ansible-vault encrypt inventory.txt
New Vault password:
Confirm New Vault password:
Encryption successful

[osboxes@master ansible-playbooks]$ cat inventory.txt
$ANSIBLE_VAULT;1.1;AES256
33363732386161363837306334323835353030636361626661656234646264656133316330346333
6430633838646432366338636162343861363363343633660a326531356235633338386234646466
63316530353162313635623466353465346161386363666239313931333533383532663763623565
6632653536396461340a373662323165663661616531663861626236623763646431623636313365
6137

How to decrypt an excising encrypted file

[osboxes@master ansible-playbooks]$ ansible-vault decrypt inventory.txt
Vault password:
Decryption successful

[osboxes@master ansible-playbooks]$ cat inventory.txt
linuxhost

How to encrypt a exiting file and output to a new file.

[osboxes@master ansible-playbooks]$ cat myplaybook.yml
---
- name: sample playbook
  hosts: all
  become: true
  become_user: root
  tasks:
    - name: create a user
      user:
        name: pavan
        uid: 3405
        state: present
    - name; create a second user
      user:
      name: kumar
      uid: 3406
      state: present

[osboxes@master ansible-playbooks]$ ansible-vault encrypt myplaybook.yml --output=myplaybook-new.yml
New Vault password:
Confirm New Vault password:
Encryption successful

[osboxes@master ansible-playbooks]$ ansible-vault encrypt myplaybook.yml --output=myplaybook-new.yml
New Vault password:
Confirm New Vault password:
Encryption successful
[osboxes@master ansible-playbooks]$ cat myplaybook.yml
---
- name: sample playbook
  hosts: all
  become: true
  become_user: root
  tasks:
    - name: create a user
      user:
        name: pavan
        uid: 3405
        state: present
    - name; create a second user
      user:
      name: kumar
      uid: 3406
      state: present

[osboxes@master ansible-playbooks]$ cat myplaybook-new.yml
$ANSIBLE_VAULT;1.1;AES256
65346362393834646664663363623633376465636133353733333163643538646333386635356464
3766333336353132323830343139613966363034323062330a633664653731336564643738343638
63623463333666393931313061363232306263663036613534303065653930653066626634336633
3933656663353661350a663261626566383666333631623066313333356266306561626633323435
33356238326339396262666237616662646563306238356561386433363735633733626466376532
63363162353966616164613631646266636661646433646265396335316437333936613737386335
66666561363938303563613031333433343361393135623230626464323138386463643231353837
64663137656565373538386134653038326232353666613633643762346339383739383330313634
61373366353139633265623061323237653734393236383937663862646335633764313336356533
63633831626131623936663663323263313130363330376662383837383062323264636137366638
64333966326463643730356463613636623231643835356531616434616566383034376332636163
31633165363965336536356531356561663964666630313262633263636566323433653937653934
36636561303162346533313332303661343630303564306137353438643534393966356364346635
38373366616337623636363331316639376166373739376562313761623230343039336236376339
66373331343031616463326535363838653739623461643065306562353464656234333465393833
64376332376436643661633463393763303663643934333733383963663833326638313438656133
33613566383263616265363962356633356331383032343062336232333463316532373463633738
3632613562623837396338626136353833613762323861303337


How to change the password of encrypted file 

[osboxes@master ansible-playbooks]$ ansible-vault rekey  myplaybook-new.yml
Vault password:
New Vault password:
Confirm New Vault password:
Rekey successful

How to run encrypted playbook

[osboxes@master ansible-playbooks]$ cat linux-user.yml
$ANSIBLE_VAULT;1.1;AES256
66656130323264306261626638333937653734616232643762663164353661383537366634326439
3161363539653865346136353133313037623662653336360a393731373363343266383630653635
66353537313666306338303364633131376466376465373962323161353131646332643331303232
3436626635633631370a336361653664613633353661336631656234623332666438633134313564
31363161626330363437633739313961396438646537383566643862336634646134613831323538
65313364643363613363623937653439376363343266613065623236393237333236643532356666
66643231663631393935326537616261353432346434643861343036333964623061386335383336
63343062643930306539373537326661623238653333653564646635376232626638326534343633
37646434303633313138313433316561306362323537646162663939323837613664663362633261
31316130656461333162633239353834623464373563623832653234353362396139656362353333
36393034643938306535653636376465336133653335326363393637386633623466333862303765
63613531393839636661326562336266353966316561643830306435326565626164346532373135
35353561353563613166626362663535323932336262633737353363373734616464313137306537
34363634343564376636306138383365366636623135623930373063613236666539646337623737
306336363139613839663765623331666633

[osboxes@master ansible-playbooks]$ cat inventory.txt
linuxhost


[osboxes@master ansible-playbooks]$ ansible-playbook --vault-id @prompt linux-user.yml -i inventory.txt -K
BECOME password:
Vault password (default):

PLAY [Create a Linux User] **********************************************************************************************************************************

TASK [Gathering Facts] **************************************************************************************************************************************
ok: [linuxhost]

TASK [User Account Creation] ********************************************************************************************************************************
changed: [linuxhost]

PLAY RECAP **************************************************************************************************************************************************
linuxhost                  : ok=2    changed=1    unreachable=0    failed=0    skipped=0    rescued=0    ignored=0


Monday, 1 March 2021

Ansible playbook for creating a directory

 Step 1) Create a sample file on ansible master server.

[osboxes@master ansible-playbooks]$ touch /tmp/sample.txt

Step 2) Create a playbook

---
- name: create a directory and copy a file to remote hosts
  hosts: all
  become: yes
  become_user: root
  vars:
    remote_dir: /tmp/example
    sample_file: /tmp/sample.txt

  tasks:
    - name: Create a directory on remote host
      file:
        path: "{{ remote_dir }}"
        type: directory
        recurse: true

    - name: copy a file from ansible master to remote directory
      copy:
        src: "{{ sample_file }}"
        dest: "{{ remote_dir }}"

Step 3) Check the syntax

[osboxes@master ansible-playbooks]$ ansible-playbook create_dir.yml -i inventory.txt --syntax-check
playbook: create_dir.yml

Step 4) Run the playbook

[osboxes@master ansible-playbooks]$ ansible-playbook  create_dir.yml -i inventory.txt -K
BECOME password:

PLAY [create a directory and copy a file to remote hosts] ***************************************************************************************************

TASK [Gathering Facts] **************************************************************************************************************************************
ok: [linuxhost]

TASK [Create a directory on remote host] ********************************************************************************************************************
changed: [linuxhost]

TASK [copy a file from ansible master to remote directory] **************************************************************************************************
changed: [linuxhost]

PLAY RECAP **************************************************************************************************************************************************
linuxhost                  : ok=3    changed=2    unreachable=0    failed=0    skipped=0    rescued=0    ignored=0


Step 5) Verify if the directory is created and file has been copied on the remote host

[osboxes@linuxhost tmp]$ ls -l /tmp/example/
total 0
-rw-r--r--. 1 root root 0 Mar  1 05:15 sample.txt